 adsenservice
Related Articles
AI generated images have become a useful part of modern content creation. Whether I am working on a blog post, social media content, presentation, website banner, or featured image, AI can help create visuals much faster than traditional design methods. However, getting a good image is not always as simple as typing a few words and pressing generate.
Sometimes the result looks completely different from what I had in mind. The subject may be in the wrong position, the background may not fit, the lighting may feel unnatural, or important details may be missing. In my experience, the biggest improvement usually comes from learning how to write better prompts.
A well written prompt gives an AI image generator clearer instructions. Instead of leaving everything to the AI, you explain what you want to see, how you want it to look, and what details are important. In this article, I will explain how to improve AI generated images with better prompts and share practical techniques that can help produce more useful and attractive results.
Why AI Image Prompts Matter
An AI image generator depends heavily on the instructions you provide. A vague prompt gives the system more freedom to interpret your idea. Sometimes that freedom produces something impressive, but it can also create an image that does not match your expectations.
For example, a prompt such as “a beautiful garden” is very simple. The AI has to decide the type of garden, season, plants, lighting, camera angle, and overall style.
If I change the prompt to “a peaceful home garden with raised wooden beds, healthy green vegetables, colorful flowers, natural morning sunlight, a small stone pathway, realistic photography style, and a clean composition,” the AI receives much more information.
This does not guarantee perfection, but it gives the image generator a clearer direction.
Start With the Main Subject
The first thing I focus on when writing an AI image prompt is the main subject. The AI needs to understand exactly what the image is about.
If I want an image for a technology article, I might begin with “a modern laptop on a clean wooden desk.” If the article is about gardening, I could start with “a healthy vegetable garden in a backyard.”
The main subject should be described clearly before adding smaller details. This helps keep the image focused.
I also avoid putting too many unrelated subjects into one prompt. When there are too many competing elements, the final image can become visually confusing.
Describe the Environment
After identifying the main subject, I describe the environment around it. This is one of the easiest ways to make AI generated images feel more realistic.
Instead of simply asking for “a laptop,” I might describe a laptop sitting on a modern office desk with a notebook, coffee cup, small plant, and soft daylight coming through a window.
The environment gives the AI additional context. It also helps create a story around the main subject.
For blog featured images, this is particularly useful because the background can help communicate the topic without requiring too much text.
Be Specific About Lighting
Lighting can completely change the appearance of an AI generated image. I have found that adding a simple lighting description often produces a more polished result.
You can mention natural morning light, warm evening light, soft studio lighting, bright daylight, dramatic lighting, or gentle window light.
For example, a travel article might benefit from warm golden hour lighting, while a technology article might look better with clean studio lighting.
The important thing is to choose lighting that matches the subject and mood.
Include the Desired Style
AI image generators can create many different visual styles. If you do not mention a style, the tool will decide one based on your prompt.
For a professional blog, I usually prefer descriptions such as realistic photography, clean modern design, natural colors, professional editorial style, or high quality commercial photography.
If you want something more artistic, you can describe an illustration, watercolor style, digital art, or another appropriate visual direction.
The style should match the purpose of the image. A serious educational article may need a clean professional appearance, while a creative article can use a more artistic approach.
Explain the Composition
Composition describes how different elements are arranged in the image.
This is especially important for blog featured images because you may need space for the article title. If the main subject covers the entire image, adding text later can become difficult.
I might write something like “place the laptop on the left side with open space on the right for a title.”
Another option is to ask for the main subject in the center with a clean background around it.
Simple composition instructions can make the final image much easier to use.
Use Better Descriptive Words
The words you choose can make a difference. Instead of relying on generic terms such as “nice,” “good,” or “beautiful,” describe what you actually want.
For example, instead of saying “a nice office,” I might say “a bright modern home office with a clean wooden desk, organized workspace, soft natural light, and minimal decoration.”
Specific descriptions give the AI more useful information.
I recommend thinking about what you would tell a photographer or graphic designer if you were hiring one. Explain the scene in a way that another person could understand.
Add Camera Details When Appropriate
For realistic images, camera related descriptions can sometimes help guide the visual result. You can mention a close up view, wide angle composition, shallow depth of field, portrait perspective, or editorial photography.
For example, a food article might benefit from “close up food photography with shallow depth of field and soft natural light.”
A travel article might work better with “wide landscape view showing mountains, a lake, and surrounding forest.”
You do not need to use complicated technical photography terms in every prompt. Use them when they help communicate the visual idea.
Use Negative Instructions Carefully
Some AI image tools allow you to specify things you do not want. This can be useful when a particular problem keeps appearing.
For example, you might specify that you do not want a cluttered background, unnecessary objects, distorted hands, unrealistic proportions, or excessive text.
However, I do not recommend making prompts unnecessarily complicated. Start with the main idea and add restrictions only when they solve a specific problem.
This makes the prompt easier to understand and easier to modify later.
Improve One Problem at a Time
One of the biggest mistakes beginners make is completely rewriting the prompt after every generation.
I prefer a more controlled approach. First, identify what is wrong with the current image. Then change the prompt specifically to address that issue.
For example, if the subject is good but the background is too crowded, keep the main prompt and add “simple uncluttered background.”
If the lighting looks too dark, add “bright natural daylight.”
If the subject is positioned incorrectly, add a composition instruction.
This method makes it easier to understand what changes are actually improving the image.
Create Several Versions
Even with a strong prompt, the first generated image may not be perfect. That is normal.
I usually treat AI image generation as an experimental process. Generate several versions, compare them, and identify which elements work best.
One version may have better lighting while another has a better composition. You can then refine your prompt based on those results.
The goal is not necessarily to create the perfect image on the first attempt. The goal is to gradually move toward the result you want.
Use Reference Images When Available
Some AI image tools allow users to provide reference images. This can be extremely helpful when you want a particular composition, subject, color arrangement, or visual direction.
A reference image gives the AI additional information that words alone may not communicate easily.
For example, if you are trying to create a consistent style for your blog, a reference image can help guide new images toward a similar visual appearance.
Always make sure you have appropriate rights to use any reference material, especially when creating content for commercial websites.
Write Prompts Around the Article Topic
For blog featured images, I think relevance is more important than simply making something visually impressive.
Before writing the prompt, I ask myself what the article is actually about.
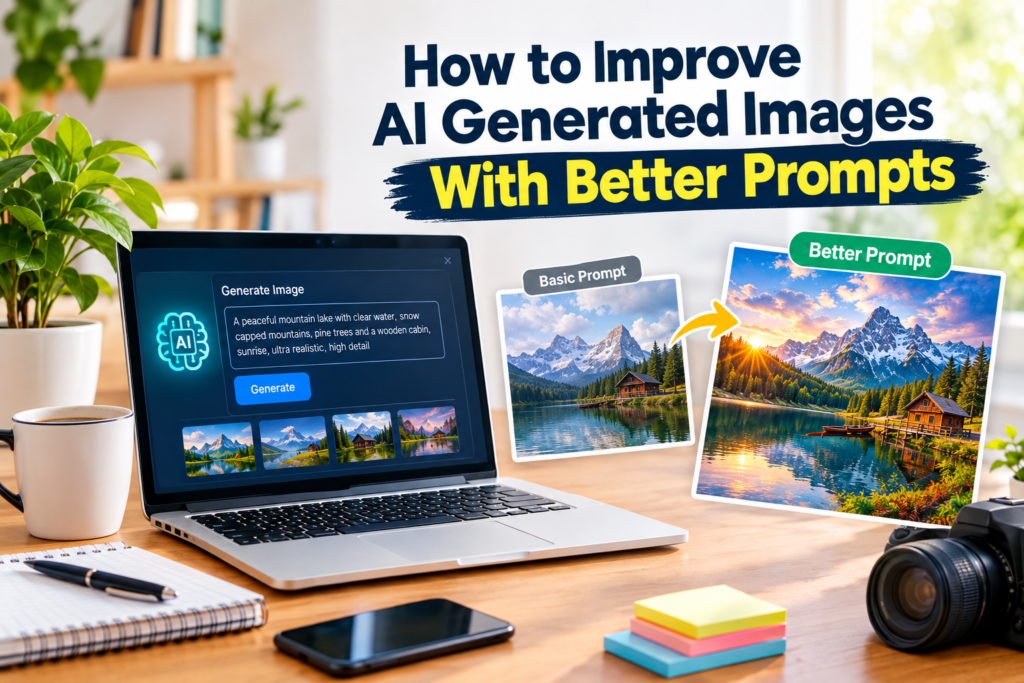
If the article is “How to Improve AI Generated Images With Better Prompts,” the featured image could show a laptop displaying an AI image generator, a clear prompt, and several improved image variations.
If the article is about gardening, the image should communicate gardening rather than simply showing a generic landscape.
The closer the connection between the image and article, the more useful the featured image becomes.
Keep Text on AI Images Simple
AI image generators have improved significantly, but text inside generated images can still sometimes contain mistakes.
For this reason, I prefer keeping text minimal. If the featured image needs the article title, it is often better to generate the visual first and add the final text using a design application.
When text is generated correctly, it can look good, but I always check spelling and readability before publishing.
For WordPress featured images, a short title with a clean layout is usually easier to read than a large amount of text.
Optimize the Final Image for WordPress
Creating the image is only one part of the process. Before uploading it to WordPress, I recommend checking its dimensions and file size.
A very large image can increase page loading time. A heavily compressed image may lose quality.
I usually aim for a good balance between visual quality and file size. I also use a descriptive file name and relevant alt text.
These small steps can make image management easier and contribute to a better overall website experience.
My Simple AI Prompt Formula
When I want to create an AI generated image, I find it helpful to follow a simple structure:
Subject + Environment + Action + Lighting + Style + Composition + Important Details
For example:
“Modern laptop displaying an AI image generator, placed on a clean wooden desk in a bright home office, creative image variations visible on screen, soft natural window light, realistic professional photography style, laptop positioned on the left with clean space on the right, organized workspace with notebook and small plant.”
This formula is flexible and can be adapted to almost any topic.
Final Thoughts
Learning how to improve AI generated images with better prompts is mostly about learning how to communicate your visual idea clearly. You do not need to write extremely complicated prompts. What matters most is providing useful information about the subject, environment, lighting, style, composition, and important details.
In my experience, the best results come from experimentation. Start with a clear prompt, generate an image, identify what needs improvement, and adjust one part at a time. Over time, you will learn which descriptions work best for the AI tool you are using.
AI image generation is becoming an important part of blogging and content creation. With better prompts and careful editing, you can create professional looking visuals that match your articles, strengthen your website design, and make your content more attractive to readers.
The key is simple: do not just tell the AI what you want to see. Explain how you want it to look. That small change in your approach can make a noticeable difference in the quality of your AI generated images